Intro
This page is what I've condensed out of my rules of thumb and experience of tearing things apart since I was 2. It never occured to me before that other people might want this until I tried explaining how to do it to a friend of mine. Most of this stuff will be obvious, but sometimes even just stating the obvious is helpful, because sometimes different people will find different things obvious, and take away new points that weren't. Stating the obvious can be helpful too, in that it reinforces good habit.
Topics
Essential tools
Out of all the things you can buy, there's really a few essential items for tearing down today's equipment. Most of which you can buy at stores like Harbor Freight, or Home Depot, or Hobby Lobby (or insert favorite hobby store here).- Tiny screwdrivers. A good assortment of them, in the four major types: flat, philips, torx, hex. I suggest that higher quality ones (hardened tips) are a good idea, if only because on my DSLR teardown I broke off the tip of one of my cheaper phillips head screw drivers on a screw that was notoriously difficult to remove. That lead to an extra 30 minutes attempting everything to extract the broken tip in order to proceed with the fix. Oh, and when you're panicked or plainly pissed off (I was both on that repair), it's just one more ounce of tug on that metaphorical "stick" that's about to snap. Trust me, your sanity is far worth the extra little $$$ you'll pay. It also means that the flat blades in the set won't twist like those cheap ones do.
- jewelry bags. Find them at a hobby store, or a jewelry supply site online. Use them for keeping track of small parts, tape them to the screw map. You're using a screw map, right?
- pen and paper. Make notes of what the hell you're doing and thinking. If you're a software geek, you've probably heard somewhere the anecdotes and research about how your brain has about seven working registers at any one time, plus or minus two. When you're stressed, it's Minus. On a teardown of something you've never done before, you're going to forget stuff. Don't be stupid and just use a tool that is easy and cheap... I suggest pen and paper and not a computer text file for obvious reasons that you can doodle and scribble little pictures to remind you more of what the hell you're talking about. Remember kiddies, comments are not only for code!
- Clean area. No brainer here, you don't want to go searching through your junk just to find that screw that went flying when you pryed a bit too hard...
- Good general lighting.
- head lamp. Yep. Energizer sells a pretty good one for about $10. Getcher self one.
- needlenose pliers
- hemostats
- helping hands. The little aligator clips on poseable arms. Optional.
- scotch tape. For screw mapping, and to hold things apart or together depending what it is you need at the moment.
- electrical tape
- Straight flat razor blades
- razor knife
- A set of eye loupes. Harbor Freight sells a good cheap set.
- dental probes, again HF sells a good set.
- putty knives, smallest size. Harbor Freight actually had a set of Nylon case cracker tools specifically for prying off car panels, and those would be awesome for many a case opening, however, they also might not be thin enough. You want putty knives because when you're cracking a case that's been press fit together (like those plastic tab-slot types) you don't want to use flat blade screw drivers, because they inevitably chew into the plastic case, always marring it up and showing people you've done something. Ugly all the way around, ugly on the case, and shows people you lack skillz, which you don't.
- pallet knives, metal ones. OPTIONAL. These are for doing the tiny work that the putty knives can't do.
Document it!
Screw Mapping
I figured a dedicated section of it's own might be good to explain some of the pieces of paper seen in any of my teardown projects.
One technique I've found extremely useful is what I call "screw mapping". With today's electronics being stuffed into ever smaller packages, I've found myself ending up with tons of tiny screws when attempting to fix something. The challenge when dealing with all those screws isn't merely in keeping them all safe, that's easy, get a bag or box. The biggest challenge is in remembering where they came from!
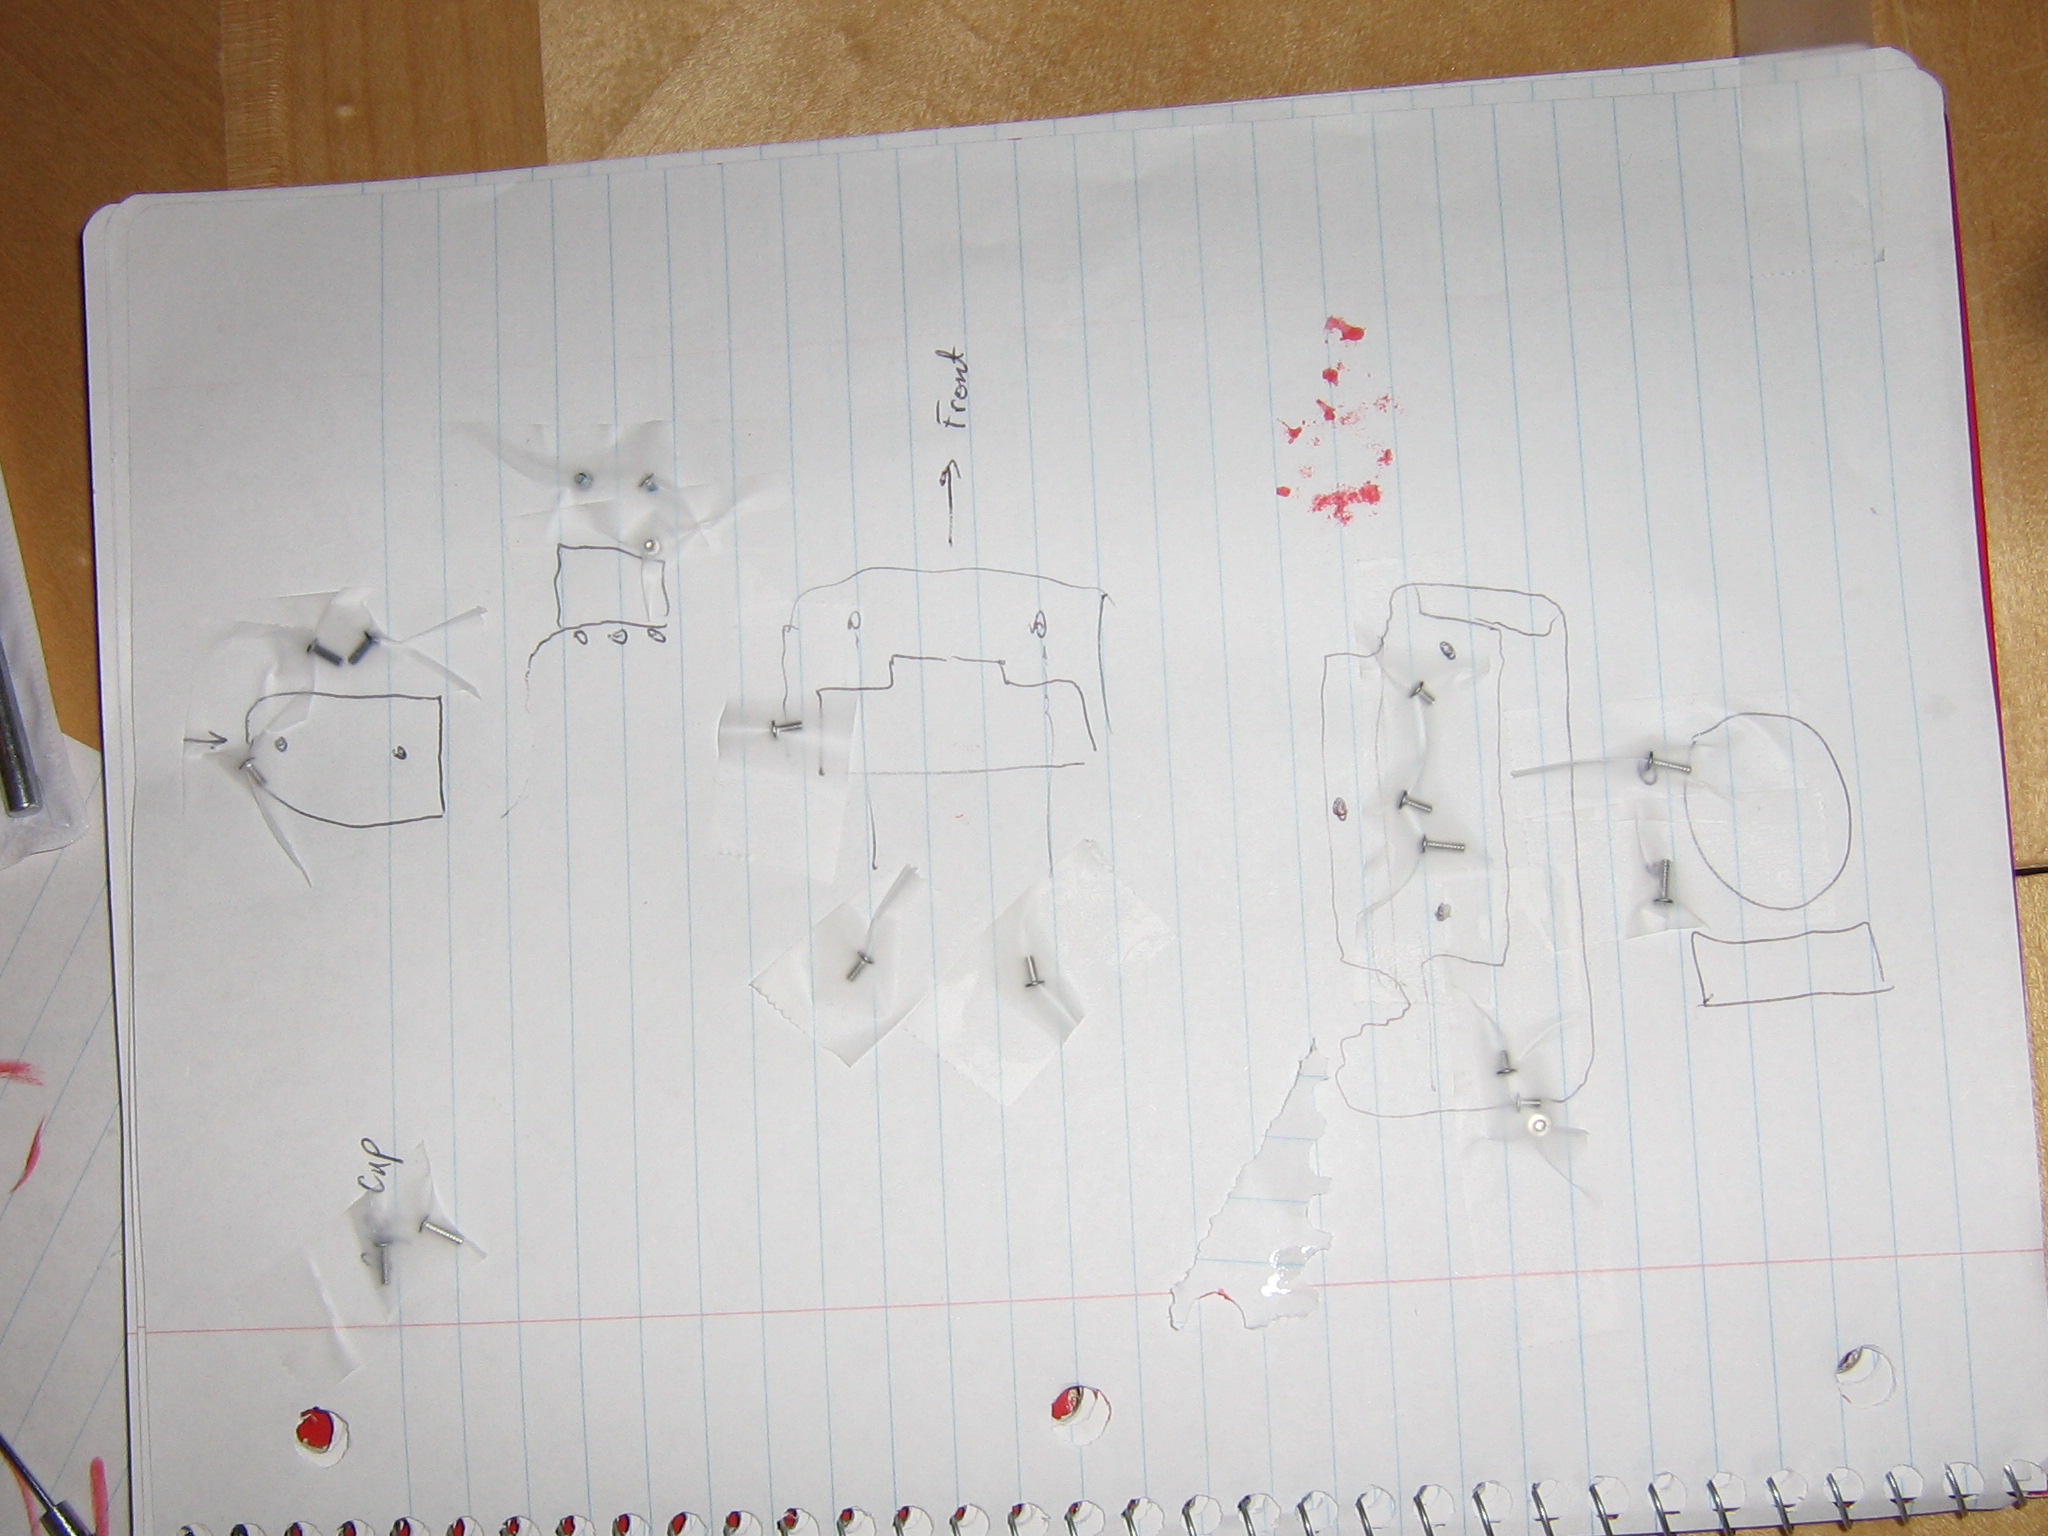
The map from
my DSLR teardown
I've found that the easiest way to keep track of the screws AND keep track of where they go is to use a "screw map". Simply put, grab a few sheets of printer paper, and while disassembling the piece in question, draw small pictographs of where you took screws from, and tape them with the picture. If you even need to remember order, you can scribble it down next to which screws go in what order. See some of the pictures to get an idea of what screw mapping is. I've found it useful and developed this technique when first pulling apart my 600X Thinkpad in 2002 to repair it's power connector. That repair required pulling the entire laptop apart to pull out the motherboard. It certainly felt like I was unscrewing damn near every screw that laptop had in it, and I needed a way not only to keep track of the screws I pulled out, but where they went too. Since then I've used this technique on many an item, from digital cameras to portable DVD players.
Obviously, this also works for parts. In any order, it's insanely useful to have a map of how you took the damn thing apart, so you can at least have a clue in how to put it back together! In addition, it's useful to know the sequence in how you took something apart, and a screw map can be used for that too, just add more information such as numbers.
Labeling connectors and directions they were plugged in (polarities) also is handy, and in the case of some cables life saving. With the medussa's head that some assemblies can be, the question becomes one of the other of the 5 W's in the "WTF!?!". Now it's not WHAT, it's WHERE. If you can't label on the board where a cable's matching number is, use your screw map and scribble down a quick picture with the cable's number that you gave it.
I've also found that when taking complex cases apart, like a laptop, it's sometimes best to tape the screws next to the hole they came out of. There's one drawback to this though in that with the map you at least see WHAT needs to go back, not just where. With taping them to the case you may end up leaving screws out until it's too late, then having to disassemble it and reassemble it. I've done that, it's not fun. One alternative is to use colored masking tape like the blue painters tape that 3M makes.
Pictures!
I'll preface this by saying that there isn't really a good replacement for a screw map. I will say that it is amplified by pictures. Find a good point and shoot that has a "flowers" mode, and you'll get some pretty good up close snapshots of the thing you're taking apart. No real need for that DSLR with the macro lens, unless you've got one already.
Video is an even better way to document how you got things apart. The two downsides are that video cameras can never catch every angle you need, and eventually run out of tape. Nevertheless, it can still give you a good idea of steps you've forgotten. Oh, and as with the digital camera, it gives you a chance to document it up for posting on the web (maybe even for egregiously making ad revenue, but I wouldn't know anything about that... ;) )
Tearing down the victim, er, item
This section really only applies to things I care to put back together. Most times when I have a piece of equipment or electronics that I'm harvesting parts from, I do the hack and slash routine in an effort to maximize time efficiency. With that said, let's continue.
My #1 rule of tearing stuff apart:
Rule #1: Finesse over force.If something is not giving way, more force is not usually the best answer. It usually means that you've missed something. Go back and do your recon again. The usual nquestions you have to ask yourself are:
- Is there a tab on the cover that you're not seeing?
- Are you leveraging it wrong?
- Is there an inside screw?
- Is there a screw that's covered by a decal that you didn't realize was there?
Rule #2: Take your time!There's nothing worse than busting something like that flat flex cable connector because of haste. I speak from experience, it's extrordinarily frustrating when you find that you've found the problem and fixed the item, only to cripple it by busting one of those small parts. All because you were blowing through it. Where's the fire? What's the rush? The exceptions to this are when you're trying to disarm a nuclear weapon while it's ticking away with a countdown that you're not going to beat by running away. But that doesn't really count because you'd not be wanting to put it back together later...
Part of taking your time also means leaving enough time in the schedule to do this task, or being able to set down the teardown and it's parts where they are or packing them up without damaging them/jumbling them. It also means that the documentation step mentioned above is all the more important, because again, as with code, comments aren't there to tell you how you did it today, there there because you'll need them tomorror or a week/month/year down the road.
Rule #3: You're a surgeon, not a butcherAlong with rules #1 and #2, remember to take utmost care when cutting anything. You're a surgeon, not a butcher, and surgeons get paid a princely sum for the fact that they can cut well and stitch even better. If you want things to go back together, it takes care and caution in order to keep all the connections in working order. Remember, these days it's damn near impossible to repair things like flex cables that you inadvertenly cut because you weren't being careful.
Back together again
There's nothing better than saying "It's AAAAALIIIIIIIIIVEEEE" and actually having the proof to back it up. It's the glory of being able to tell people that you did it. It gives one the feeling of that mad scientist mixing chemicals in his dungeon lab, and laughing maniacally that it worked. But hold on there Sparky, there's a few steps you've got to walk before you get to the glory. Yes, that's right, you got to reverse the entire process, and get the damn thing back together. There's few things to say here really, except that everything I've said up to this point should have made life ten times easier by the time you get to this task. There's only one major point I'll reinforce: finesse over force. As an army manual I once read put it,
"If it doesn't go back together easily, DON'T FORCE IT! You took it apart, there is something wrong with how you've put it back together."
Closing words
I hope this hasn't been a waste of your time, and that if anything, you can point your lesser experienced compatriots towards this page, to give them food for thought. My biggest hope is that it gets you thinking about the next thing you're going to tear down.
Bitreaper.